移植完NOR Flash后需要移植NAND Flash,下面介绍一下移植过程。开发板上使用的NAND Flash型号为Samsung K9F2G08U0B,256M x 8 Bit NAND Flash芯片。
修改配置文件
打开include/configs/smdk2440.h文件,在其中找到NAND Flash配置部分,将其由2410的定义修改为2440的:
1
2
3
4
5
6
7
8
9
10
11
12
13
| --- a/include/configs/smdk2440.h
+++ b/include/configs/smdk2440.h
@@ -160,8 +160,8 @@
* NAND configuration
*/
#ifdef CONFIG_CMD_NAND
-#define CONFIG_NAND_S3C2410
-#define CONFIG_SYS_S3C2410_NAND_HWECC
+#define CONFIG_NAND_S3C2440
+#define CONFIG_SYS_S3C2440_NAND_HWECC
#define CONFIG_SYS_MAX_NAND_DEVICE 1
#define CONFIG_SYS_NAND_BASE 0x4E000000
#endif
|
NAND Flash的相关驱动代码位于dirvers/mtd/nand/下,打开其中的Makefile文件,仿照2410的写法添加2440的支持:
1
2
3
4
5
6
7
8
9
10
|
@@ -63,6 +63,7 @@ obj-$(CONFIG_NAND_MXS) += mxs_nand.o
obj-$(CONFIG_NAND_NDFC) += ndfc.o
obj-$(CONFIG_NAND_PXA3XX) += pxa3xx_nand.o
obj-$(CONFIG_NAND_S3C2410) += s3c2410_nand.o
+obj-$(CONFIG_NAND_S3C2440) += s3c2440_nand.o
obj-$(CONFIG_NAND_SPEAR) += spr_nand.o
obj-$(CONFIG_TEGRA_NAND) += tegra_nand.o
obj-$(CONFIG_NAND_OMAP_GPMC) += omap_gpmc.o
|
以2410的配置为基础复制一份过来:
1
| cp s3c2410_nand.c s3c2440_nand.c
|
将其中的S3C2410全部替换为S3C2440,这样,针对S3C2440的配置文件就建立好了,下面就要针对2440来修改其中的内容。
修改寄存器及时序定义
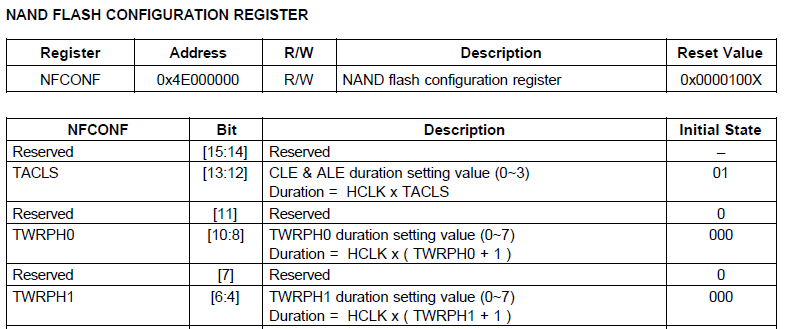
2440的NAND Flash控制器寄存器定义和2410的不一样,所以要先修改s3c2440_nand.c中的寄存器定义。关于2410与2440的详细区别及这些寄存器的具体用处,可参考这篇文章。
将原来寄存器定义全部删掉,改成下面这样:
1
2
3
4
5
6
7
8
9
10
11
12
13
14
15
|
#define S3C2440_NFCONT_SECCL (1<<6)
#define S3C2440_NFCONT_MECCL (1<<5)
#define S3C2440_NFCONT_INITECC (1<<4)
#define S3C2440_NFCONT_nFCE (1<<1)
#define S3C2440_NFCONT_MODE (1<<0)
#define S3C2440_NFCONF_TACLS(x) ((x)<<12)
#define S3C2440_NFCONF_TWRPH0(x) ((x)<<8)
#define S3C2440_NFCONF_TWRPH1(x) ((x)<<4)
#define S3C2440_ADDR_NALE 0x08
#define S3C2440_ADDR_NCLE 0x0C
|
以上宏定义的值是根据2440的数据手册确定的,比如NFCONT寄存器的定义如下:

再来看时序设置,程序中有这么一段:
1
2
3
4
5
6
7
8
9
| #if defined(CONFIG_S3C24XX_CUSTOM_NAND_TIMING)
tacls = CONFIG_S3C24XX_TACLS;
twrph0 = CONFIG_S3C24XX_TWRPH0;
twrph1 = CONFIG_S3C24XX_TWRPH1;
#else
tacls = 4;
twrph0 = 8;
twrph1 = 8;
#endif
|
故我们需要定义相关的一些宏:
1
2
3
4
5
|
#define CONFIG_S3C24XX_CUSTOM_NAND_TIMING
#define CONFIG_S3C24XX_TACLS 2
#define CONFIG_S3C24XX_TWRPH0 1
#define CONFIG_S3C24XX_TWRPH1 0
|
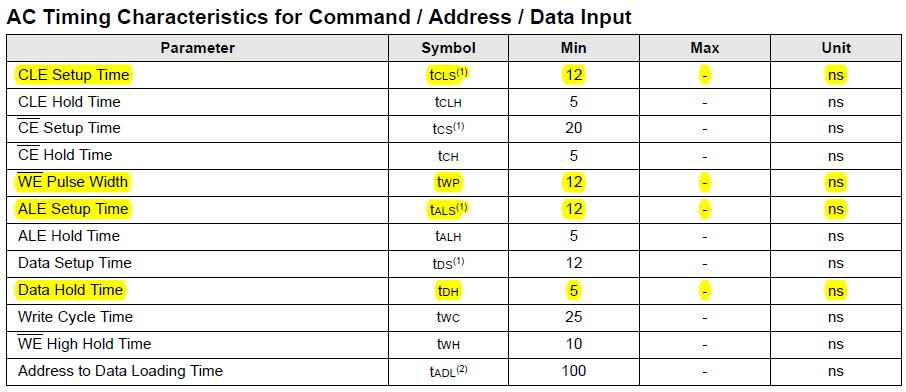
宏定义值根据Flash芯片数据手册确定,以开发板上使用的K9F2G08U0B为例,从它的数据手册中可以查到:

具体变量间的对应关系可对比其时序图得到,这里就不展开了。这几个量的值会影响读写速度,需要仔细对照数据手册才能确定最优值,以取得最佳的读写性能,充分发挥出硬件的潜力。
修改初始化代码
根据终端输出信息NAND: 0 MiB,以NAND: 为关键词搜索,之后跟踪代码执行流程即可找到NAND Flash初始化的入口为nand_init_chip()函数,这个函数的主要结构如下:
1
2
3
4
5
6
7
8
9
10
11
12
| static void nand_init_chip(int i)
{
if (board_nand_init(nand))
return;
if (nand_scan(mtd, maxchips))
return;
nand_register(i);
}
|
board_nand_init()函数用于对NAND Flash进行底层初始化;nand_scan()函数用于识别NAND Flash的型号及大小。仅有board_nand_init()函数是和底层硬件相关的,故移植时只需关注此函数即可,此函数也位于s3c2440_nand.c文件中。
只需修改NFCONF及NFCONT寄存器配置,将原有代码替换为:
1
2
3
4
5
6
7
8
9
10
11
12
|
cfg = S3C2440_NFCONF_TACLS(tacls);
cfg |= S3C2440_NFCONF_TWRPH0(twrph0 - 1);
cfg |= S3C2440_NFCONF_TWRPH1(twrph1 - 1);
writel(cfg, &nand_reg->nfconf);
cfg = S3C2440_NFCONT_SECCL;
cfg |= S3C2440_NFCONT_MECCL;
cfg |= S3C2440_NFCONT_MODE;
cfg |= S3C2440_NFCONT_INITECC;
writel(cfg,&nand_reg->nfcont);
|
修改写入函数
对于S3C24x0系列CPU,是通过s3c24x0_hwcontrol()函数实现命令和地址的写入的。然而2410的s3c24x0_hwcontrol()函数不直接适用于2440,需要稍微修改一下。主要就是将NFCONF寄存器替换为NFCONT寄存器。最后修改后的代码如下:
1
2
3
4
5
6
7
8
9
10
11
12
13
14
15
16
17
18
19
20
21
22
23
24
25
26
27
28
| static void s3c24x0_hwcontrol(struct mtd_info *mtd, int cmd, unsigned int ctrl)
{
struct nand_chip *chip = mtd->priv;
struct s3c24x0_nand *nand = s3c24x0_get_base_nand();
debug("hwcontrol(): 0x%02x 0x%02x\n", cmd, ctrl);
if (ctrl & NAND_CTRL_CHANGE) {
ulong IO_ADDR_W = (ulong)nand;
if (!(ctrl & NAND_CLE))
IO_ADDR_W |= S3C2440_ADDR_NCLE;
if (!(ctrl & NAND_ALE))
IO_ADDR_W |= S3C2440_ADDR_NALE;
if (cmd == NAND_CMD_NONE)
IO_ADDR_W = (ulong)&nand->nfdata;
chip->IO_ADDR_W = (void *)IO_ADDR_W;
if (ctrl & NAND_NCE)
writel(readl(&nand->nfcont) & ~S3C2440_NFCONT_nFCE, &nand->nfcont);
else
writel(readl(&nand->nfcont) | S3C2440_NFCONT_nFCE, &nand->nfcont);
}
if (cmd != NAND_CMD_NONE)
writeb(cmd, chip->IO_ADDR_W);
}
|
特别需要注意的是第15~16行,很多移植资料上都没有这两行,然而实际测试表明,不加这个判断会写入失败,因此一定要加上这条语句,这是因为在写完命令和地址后,一定还要把IO端口的地址重新设置为寄存器NFDATA。
修改硬件ECC函数
在include/configs/smdk2440.h文件中我们定义了宏CONFIG_SYS_S3C2440_NAND_HWECC,此时会启用硬件ECC功能。相关函数有三个:s3c24x0_nand_enable_hwecc()、s3c24x0_nand_calculate_ecc()、s3c24x0_nand_correct_data(),其中需要修改的函数只有s3c24x0_nand_enable_hwecc(),主要还是将NFCONF寄存器改为NFCONT寄存器。修改后的代码如下:
1
2
3
4
5
6
| void s3c24x0_nand_enable_hwecc(struct mtd_info *mtd, int mode)
{
struct s3c24x0_nand *nand = s3c24x0_get_base_nand();
debug("s3c24x0_nand_enable_hwecc(%p, %d)\n", mtd, mode);
writel(readl(&nand->nfcont) | S3C2440_NFCONT_INITECC, &nand->nfcont);
}
|
测试
修改完成后编译运行,从终端输出中可以看到已经正确识别出了NAND Flash容量:NAND: 256 MiB。要进一步测试NAND Flash是否可以正常使用可使用以下方法:
使用nand info命令可输出NAND Flash的基本信息,若正确识别出NAND Flash的话,就会显示类似下面这样的信息:
1
2
3
4
5
6
7
8
9
| GMF@2440 # nand info
Device 0: nand0, sector size 128 KiB
Page size 2048 b
OOB size 64 b
Erase size 131072 b
subpagesize 512 b
options 0x40001008
bbt options 0x 8000
|
之后测试Flash的读写是否正常,可将内存中的一段数据写入Flash中再读取回来,比较二者是否相同即可。
先擦除一段空间:
1
2
3
4
5
| GMF@2440 # nand erase 0 0x80
NAND erase: device 0 offset 0x0, size 0x80
Erasing at 0x0 -- 100% complete.
OK
|
读取内存开始部分的数据:
1
2
3
4
5
6
7
8
9
| GMF@2440 # md.l 30000000 20
30000000: ea0000be e59ff014 e59ff014 e59ff014 ................
30000010: e59ff014 e59ff014 e59ff014 e59ff014 ................
30000020: 00000060 000000c0 00000120 00000180 `....... .......
30000030: 000001e0 00000240 000002a0 deadbeef ....@...........
30000040: 0badc0de e1a00000 e1a00000 e1a00000 ................
30000050: e1a00000 e1a00000 e1a00000 e1a00000 ................
30000060: e51fd028 e58de000 e14fe000 e58de004 (.........O.....
30000070: e3a0d013 e169f00d e1a0e00f e1b0f00e ......i.........
|
将这些数据写入NAND Flash中,并回读写入的数据:
1
2
3
4
5
6
7
8
9
10
11
12
13
14
15
16
17
18
19
| GMF@2440 # nand write 30000000 0 80
NAND write: device 0 offset 0x0, size 0x80
128 bytes written: OK
GMF@2440 # nand read 30000100 0 80
NAND read: device 0 offset 0x0, size 0x80
128 bytes read: OK
GMF@2440 # md.l 30000100 20
30000100: ea0000be e59ff014 e59ff014 e59ff014 ................
30000110: e59ff014 e59ff014 e59ff014 e59ff014 ................
30000120: 00000060 000000c0 00000120 00000180 `....... .......
30000130: 000001e0 00000240 000002a0 deadbeef ....@...........
30000140: 0badc0de e1a00000 e1a00000 e1a00000 ................
30000150: e1a00000 e1a00000 e1a00000 e1a00000 ................
30000160: e51fd028 e58de000 e14fe000 e58de004 (.........O.....
30000170: e3a0d013 e169f00d e1a0e00f e1b0f00e ......i.........
GMF@2440 # cmp.l 30000000 30000100 20
Total of 32 word(s) were the same
|
可以看到,二者完全相同,这说明U-Boot已完全支持了目标板上的NAND Flash。
移植好的U-Boot见我的Github项目。

